STEP ONE - A GOOD QUALITY PICTURE
I cannot stress the importance of picture quality enough!
Cause if the starting point is good, the end result can never end that bad.
Details like hair, eyes, mouth and nose should be defined clearly. Admittedly
I've worked from less, but the end result has been accordingly.
I use Photoshop for editing, since it's what I've been used to through my
many years of advertising. The key to photoshop is, that you can work in
layers. Furthermore I work in CMYK, because the colors will be easier to
adjust.
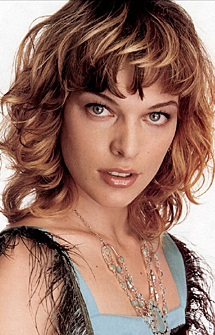
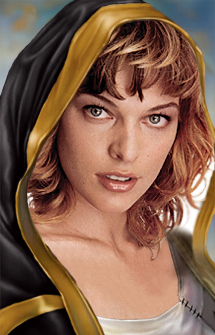
As you can see, I've already edited this picture of Milla a little (the
top picture). I've started by pasting the picture of Milla in a seperate
layer, so you at this point have the "background layer" and the
layer with the picture.
Then I've removed the background from Millas picture with the lasso tool,
taking part by part. As a result the edges of millas hair (in this example)
can be a bit rough. If so, I then use the "blur tool" to even
out the edges. When you later add a background you may find that there is
still pieces of background showing. You can at that point use the "erazer
tool" to remove the unwanted bits.
As you can see I've also removed that awful necklace and bits of the black
feather, using the clone stamp. And with this, the picture should be ready
for the next stage.
TIP:
If a picture is a bit blurry, after you have scaled it down, you can use
the filter called "Unsharpen Mask" (under filters->sharpen/).
This step is one of the more easy parts. At this point I consider what kind of class the portrait should be, and begin to add armor, robes clothes from the original BG portraits (being the only fantasy source I really have) accordingly.
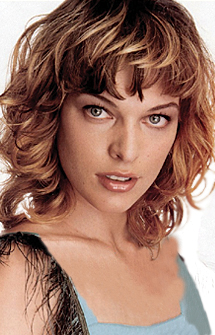
Picture #1
In this step I've added a bit of Jan's costume, to work as Milla's dress. I've resized and pulled the edges a bit, for it better to fit the perspective. A clear out fault regarding perspektive can be seen on the helmet of my DeVito portrait. So this is obviously something you have to bare in mind :)
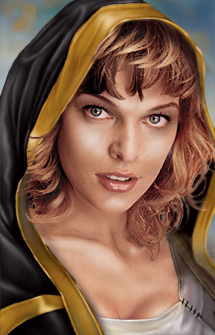
Picture #2
Here I've added Viconia's Robe. After cutting the robe out and pasted it into a seperate layer, I've dublicated the "Robe layer", adjusted the colors of the new layer (CTRL+M) to black and erazed some of it so the original yellow layer is now visible. Parts of the Robe was occluded by Viconia's hair. These parts I've removed with the "clone stamp".
TIP:
I've found out during my making of these portraits that the more you work on the armor/clothes, the better the result will be. The first portraits I made (like arnie), I used the original armor as it was. But you can get a wide variety of result, if you just put in the effort.

I decided to make this tutorial as detailed as possible. So bear over with me, if you can't find the changes in the pictures :)
Picture #1
This step is very simple. I've erazed Milla's hair, where it exceeded the Robe, and added some background. You may have to take pieces of background (again from the original portraits) and clone them (with the clone stamp), so that they cover everything. You can again use CTRL+M to adjust the colors of the background, to get some different results.
Picture #2
Here I've dublicated the Milla layer, and made it the top layer. then I have erazed everything except bits and pieces of hair sticking out past the edge of the robe. Then I've used the the "smear tool" to add length to each individual hair. This is admittedly a very small difference. But it's the details that matter.
TIP:
No tip to this step.


This is the most demanding part of the process and usually takes about an hour or more.
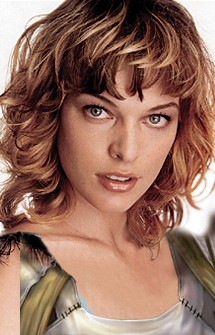
Picture #1
In this picture much has happened. I've started by creating three different layers on top of the Original Milla picture. From there I've done the following:
Layer #1 (Brush, soft, opacity: 8%): Layer one, I use for the general skin color. I select a light brown skin tone, and start painting an even color on every area of Millas Skin.
Layer #2 (Brush, soft, opacity:8%): Layer two is used for the darker areas. With the result from the first layer, I start adding color (between dark brown to black), to difine the facial features. Be sure to start with a lighter dark brown, and then gradually paint darker and darker towards the edges.
Layer #3 (Brush, soft, opacity 10%): Layer three is used for adding highlighting. I select pure white color and add highlights on areas like chin, cheeks, forehead and nose.
Picture #2
In this picture I've adjusted the colors on eyes and lips, so that the eyes are a bit darker, and the lips are a bit lighter. It's a bit vague in this portrait.
TIP:
When painting skin it is a huge advatage to do so in seperate layers, so that you can easily go back a step, if you are unhappy with the results. Remember that Photoshop has a history, in which you can go back step by step.

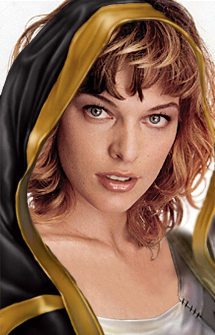
This is the final step of the process.
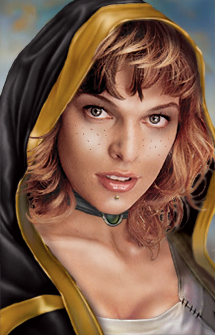
Picture #1
In this picture I've added some freckles (Brush: 1 pixel, hard edge, Opacity 50%), and given Milla some jewelry. Again all thes additions have been made in seperate layers.
The necklace, have first been added as a whole, and then I have erazed the part where her chin and hair was (Erazor: soft, opacity 100%).
Picture #2
This is the final image. I've added tatoos and touched up with shadows around the necklace, and Millas shirt.
Tatoos: I add a new layer, use the lasso tool to select the area I want (hold down Alt to be able to make a step by step path). Then I fill out the selection with a color, and change the "Layer opacty" to about 30%. Finally I blur the edges with the "Blur tool", and eraze the ends of the tatoos (Erazor: soft edges, Opacity:10-20%).
That's the end of this tutorial. Hope you find it useful.
TIP:
When using brushes of all sorts (paint brush, erazor, blur tool, smear tool, etc.) be sure to experiment with "Opacity" and "Size".
Now begins the part where I go over the first steps, and change what needs change, before I continue to the part where I paint the skin texture.
Picture #1
A very simple step. I've added a layer filled black, and put it behind all the other layers. So it works as the inside and shadow parts of the robe. Other than that I've added some shadow along the hairline and generally along the edges. For these shadows I use the Airbrush tool. What is important is that you set the "opacity" of the brush tool to between 5 and 10 percent (see more under "tip").
Picture #2
Not much to say about this one. As you can see I've added some cleavage. Not because it was neccesary for her to have one, but simple because the area was a bit empty. I've added the cleavage from another picture, and adjusted the colors to fit the Milla picture. Then I have simply erazed the edges of the cleavage with the "erazer" (opacity set to 40%).
TIP:
Using the "Brush tool" you have to be aware of these settings. Firstly the brush must have soft edges. Secondly you must set the opicity to between 5-10%. This way you can see the picture beneath the paint. If you want areas darker, then just go over them again, and again, until you're satisfied.